Changing your transmission fluid at home can extend your vehicle’s life, improve shifting, and prevent costly transmission repairs. The process involves draining the old fluid, replacing the filter (if applicable), cleaning the pan, and refilling with fresh transmission fluid to the correct level.
While it may sound intimidating, it is a manageable DIY project if you have basic mechanical skills, the right tools, and patience. In some cases, depending on your vehicle type, you may need a heavy lift or additional tools to safely raise your vehicle high enough to access the transmission pan, especially if working on a truck or SUV. This guide will walk you through each step clearly and thoroughly, ensuring you can confidently and safely change your transmission fluid at home while saving money on shop labor costs.
Benefits of Changing Transmission Fluid Yourself
- Save Money: Shop labor rates can add $150–$400 to the cost of a fluid change.
- Extend Transmission Life: Fresh fluid reduces wear and helps prevent overheating.
- Better Shifting: Old fluid can cause hard or delayed shifts; new fluid improves responsiveness.
- Know Your Vehicle: Doing your maintenance helps you spot leaks and other potential issues early.
How Often Should You Change Transmission Fluid?
View this post on Instagram
The frequency of changing your transmission fluid depends on your vehicle, how you drive, and the type of transmission fluid your car uses. While many manufacturers recommend changing the fluid every 30,000–60,000 miles, this is not a universal rule, and checking your owner’s manual is always your first step.
If you have an automatic transmission, most fluids are designed to last tens of thousands of miles, but they still degrade over time, especially if you drive in harsh conditions. For example, you may need to change your transmission fluid more frequently if you:
Two heavy loads (trailers, boats, work equipment) create extra heat in the transmission.
Drive in stop-and-go traffic frequently, which can strain the transmission.
Live in an area with extreme temperatures, as heat accelerates fluid breakdown.
Drive in mountainous regions, where constant shifting puts more stress on your transmission.
However, many mechanics and transmission specialists recommend periodic fluid changes regardless of manufacturer claims, as fluid can become dirty with metal particles and clutch material, reducing its effectiveness and potentially leading to premature wear.
Signs you may need to change your transmission fluid sooner include:
- Rough or delayed shifting.
- Slipping gears.
- Transmission overheating warnings.
- Dark, burnt-smelling fluid on your transmission dipstick.
Checking your fluid regularly (monthly or during oil changes) can help you spot potential issues early. Fresh transmission fluid is typically bright red or pink and clear, while old fluid may look brown, dark, or have a burnt odor.
If you are uncertain, consider having a trusted mechanic perform a transmission fluid check, especially before long road trips, to ensure your transmission is protected and operating smoothly. A fluid change is a small investment compared to the cost of repairing or replacing a damaged transmission, which can easily cost $2,000–$5,000 or more.
By staying on top of your transmission fluid maintenance, you help ensure smoother shifting, better fuel efficiency, and a longer life for your vehicle’s transmission.
Tools and Supplies You’ll Need
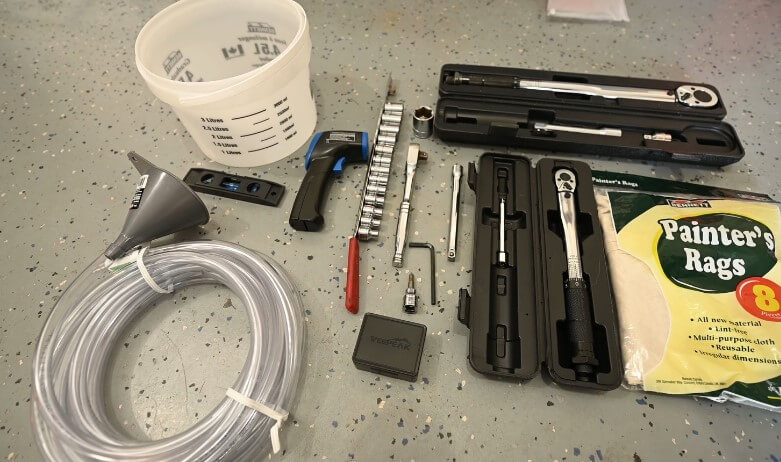
Before you start, gather:
- Jack and jack stands or ramps (consider a heavy-duty lift if your vehicle is high or heavy).
- Socket set and wrenches.
- Drain pan.
- Transmission fluid (correct type and quantity per your manual).
- New transmission filter and gasket (if applicable).
- Brake cleaner or degreaser.
- Gloves and safety glasses.
- Torque wrench.
- Shop towels.
You may also want to keep ziplock bags handy for safely storing bolts and screws during disassembly, and a clean workspace to lay out the transmission pan, gasket, and filter during cleaning and reassembly.
When planning your transmission fluid change, remember that lifting your vehicle safely and securely is critical for both comfort and safety. For sedans and compact cars, a sturdy jack and jack stands or quality ramps may be enough. However, if you’re working on a truck, SUV, or larger vehicle, you may need heavy lifts that provide higher clearance and stability to access your transmission comfortably.
According to Heavylift Direct, using heavy-duty lifts designed specifically for your vehicle’s size not only improves safety during your maintenance but also makes the job faster and easier. If you plan on handling more of your vehicle maintenance in the future, investing in a reliable lift can save time, reduce physical strain, and give you better visibility when working under your vehicle.
Having these tools and a secure lift setup will ensure you can change your transmission fluid confidently, efficiently, and safely, while setting yourself up for smoother DIY vehicle maintenance projects in the future.
Step-by-Step Instructions
Warm Up Your Vehicle
Run your vehicle for 5–10 minutes to warm the fluid, making it easier to drain. Park on a level surface, engage the parking brake, and turn off the engine.
Lift the Vehicle Safely
Using a jack and jack stands, ramps, or a heavy-duty lift, raise the vehicle high enough for safe, comfortable access to the transmission pan.
Locate and Drain the Transmission Fluid
Position your drain pan under the transmission pan. If your vehicle has a drain plug, remove it to let the fluid drain completely. If not, carefully loosen the transmission pan bolts, allowing one side to tilt down so the fluid drains into your pan.
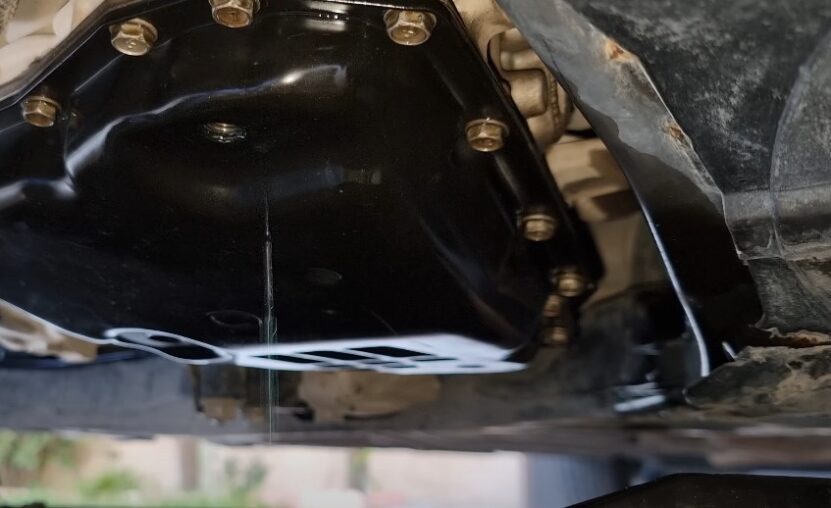
Remove and Clean the Transmission Pan
Once drained, remove the pan completely and clean it thoroughly with brake cleaner or degreaser. Clean the magnet inside the pan (if present) to remove metal shavings and check for signs of excessive debris that might indicate internal wear.
Replace the Transmission Filter
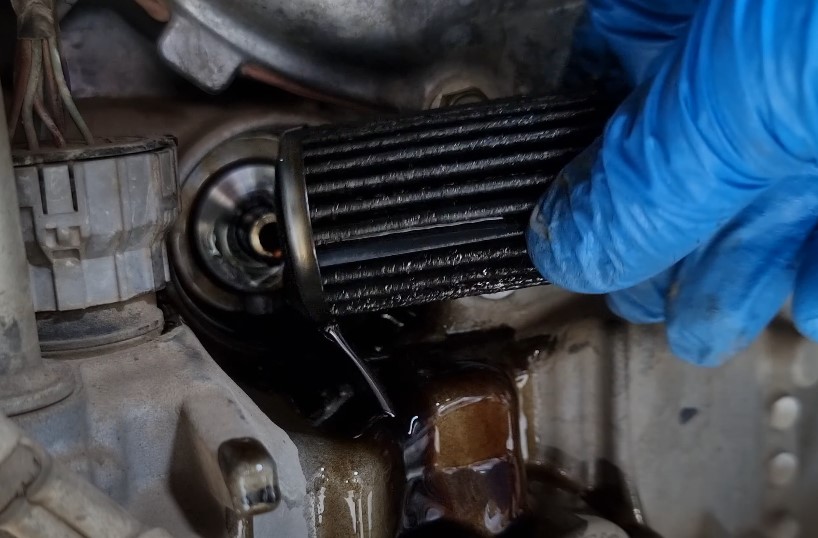
If your vehicle has a replaceable filter, remove the old one and install the new filter according to the manufacturer's instructions. This step ensures that clean fluid circulates through your transmission.
Reinstall the Pan with a New Gasket
Clean the gasket surfaces thoroughly, then install a new gasket on the pan. Bolt the pan back onto the transmission using a crisscross pattern to ensure even pressure. Use a torque wrench to tighten the bolts to your vehicle’s specifications.
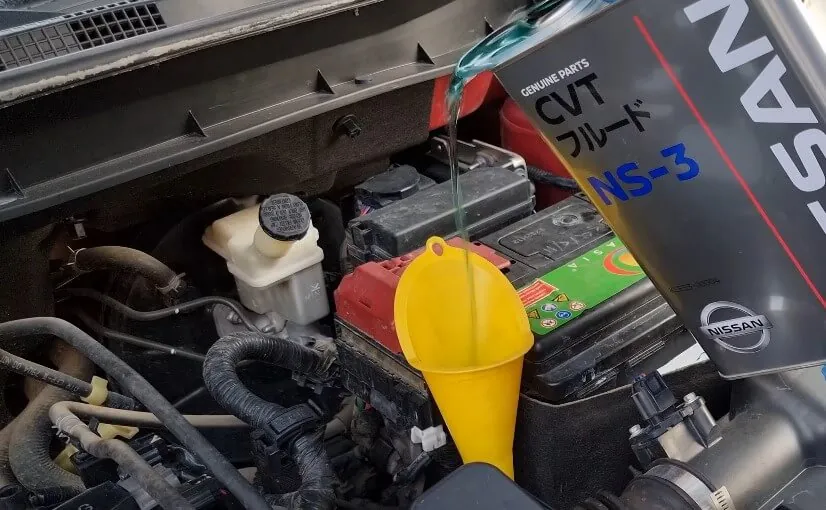
Refill with Fresh Transmission Fluid
Lower your vehicle back to level ground. Using a funnel, add the recommended type and amount of transmission fluid through the dipstick tube.
Circulate and Check Fluid Level
Start the engine and let it idle. Cycle through all gears (park, reverse, drive) to circulate the fluid, then return to park. With the engine running, check the transmission fluid level using the dipstick. Add fluid as needed until it reaches the correct level.
Post-Service Checks
- Check for Leaks: Inspect around the pan and gasket area to ensure no leaks occur.
- Test Drive: Take a short drive to warm up the transmission and test shifting.
- Recheck Fluid Level: After the drive, recheck the fluid level and top off if necessary.
Conclusion
Changing your transmission fluid at home is a practical way to save money, learn more about your vehicle, and keep your transmission in good health. With a methodical approach, the right tools, and patience, you can perform this essential maintenance task confidently, ensuring smoother drives and extending the life of one of your car’s most expensive components.